
PLAE is an acronym that stands for Prefer, Low-Avoidance, Avoid, and Exclude.
- The configuration of a PLAE relates to the algorithm that drives the routing process.
- There is no limit to the number of PLAEs that can be created. This allows the user to vet multiple scenarios at once, in one project.
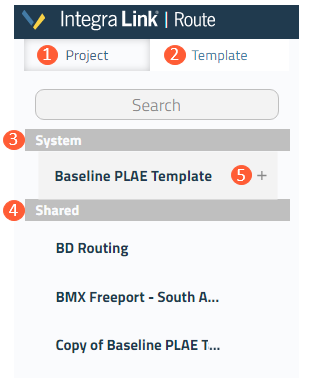
| 1. Project Tab | Shows PLAE that are specifically configured for a project. This tab will be empty at the start of a project. |
| 2. Template Tab | Shows PLAE that are available to a user within their Account. Available templates are organized by System and Shared. |
| 3. System |
Provides a system-wide default PLAE called Baseline PLAE Template. This template is designed to provide a good starting point for most locations in the lower 48 states. Important: The settings of the Baseline PLAE should always be Refined and reviewed before and after generating routes. |
| 4. Shared | Lists the library of templates that have been created and shared by users within an Account. If this section is empty, it is because no templates have been shared. |
| 5. Add | The Add button will add the selected PLAE template to the Project Tab, where it can be configured, saved, and applied to the project to generate a route. |
Getting Started
To begin PLAE configuration, a user must first Add a PLAE Template to their project.
There are several tools that can be used to help organize multiple PLAEs in a project. For a list of options, select the dropdown menu on the right-hand side of the PLAE's card:
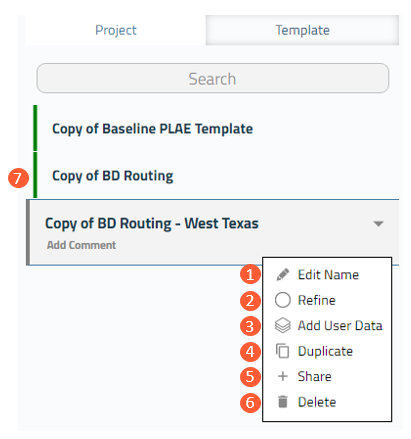
| 1. Edit Name | Select to change the name of the PLAE. |
| 2. Refine |
Select to significantly reduce the number of features in the PLAE and only show sources and sub-types that are available in the project AOI. The Refine action can only be completed once a project has finished archiving. Refining a PLAE will make set-up more efficient: the user does not have to consider changing weights on features that do not exist in the project AOI. The recommended workflow is to let the archive process finish, then refine the project PLAE before making any changes to the weights or buffers. |
| 3. Add User Data | Select to apply user-added data to a specific PLAE. User Data is uploaded on the Project Details page. |
| 4. Duplicate | Select to make a copy of the PLAE and create different versions. |
| 5. Share | Select to Share a PLAE within the Account. |
| 6. Delete | Select to remove a PLAE from the Projects Tab. |
| 7. PLAE Card Color | Red indicates the PLAE is not available, as the Archive process is not complete. Grey (shown) indicates the Archive is complete, but the PLAE has not been refined. Orange indicates the PLAE is currently being refined. The PLAE is locked from editing at this time. Green (shown) indicates that both the Archive and the Refine process have completed, and that the PLAE is ready for the routing process, once configured. |
PLAE Configuration
- A user can turn on and off various sources as well as manipulate the weights of the sources to influence the routing process.
- While there are four named intervals (Prefer, Low-Avoidance, Avoid, Exclude), there are 10 incremental steps along the PLAE spectrum to allow the user to manipulate the weighting preferences on an even smaller scale.
To begin configuration, select a PLAE that has been added to the Project Tab and Refined.
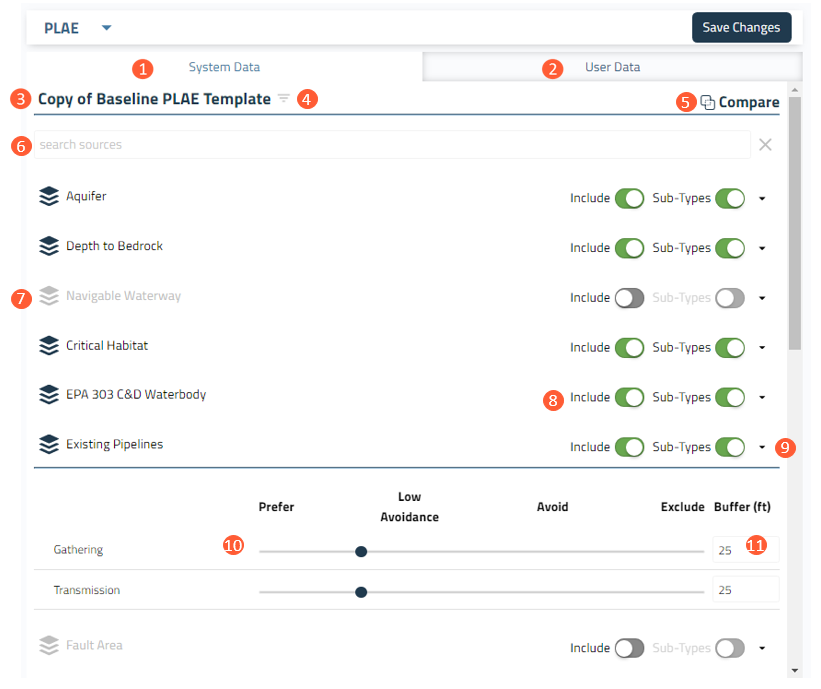
| 1. System Data Tab | Select to configure a PLAE against system data. |
| 2. User Data Tab | Select to configure a PLAE against user-added data. |
| 3. PLAE Name | The PLAE that is currently being configured. |
| 4. Filter | Select to clear the filter set by using the Search function. |
| 5. Compare | Select to compare the algorithm from two different PLAEs. |
| 6. Search | Allows the user to search for specific features within the listed sources. |
| 7. Locked Sources | After refining the PLAE, some sources will appear with greyed out text .This indicates that these features do not exist in the project AOI and will not be a part of the routing analysis. |
| 8. Include Toggle | Allows the user to choose to include or exclude sources from the routing process. This is done if a source does not provide value to a project. |
| 9. Sub-Types Toggle | Condenses all of the sub-types down within a source, allowing a single weight to be applied for all. To view available sub-types, select the dropdown arrow. Subtypes will be listed alphanumerically. |
| 10. PLAE Weights | What drives the routing process. Click and Drag the marker along the PLAE bar to set the weight for source or sub-types. |
| 11. Buffer | Each of the features will be buffered (or offset) by the specified value. The PLAE value will be applied to the entire area containing the feature and the offset. The value is specified in feet and contains default values for point and polyline features. * |
Next Steps
- Once a PLAE has been configured, select Save Changes.
- Additional PLAEs can be added to the project, either by using the Add button from the Template Tab, or by selecting Duplicate on an existing PLAE in the Project Tab, and editing it.
- Once saved, all PLAEs are still configurable. A user can continuously go back and make edits, create new PLAEs, or delete existing PLAEs.
- Next, continue to Exclusion Areas.
Notes:
* Any point or polyline feature has a buffer with a pre-assigned value that is based on years of project experience. Polygon features do not come with a pre-assigned buffer, as these features already have a defined spatial boundary. A buffer can be added or edited for any features, including polygon features. The larger the buffer value, the more a route is going to be pushed away from a feature.