
The Objectives Page is where you can:
About
The Objectives page allows you to specify a Start and End point, along with any desired intermediate points. The extent of the Project AOI is determined based on the location of Objectives.
- Intermediate objectives are not required but are useful for projects that need to target a specified midpoint in the routing process.
- There are no limits to the number of Objectives that can be added to a project, however at a minimum there should be two: a Start and End point.
- Objectives can be added or deleted throughout the life-cycle of a project.
Set Project Objectives
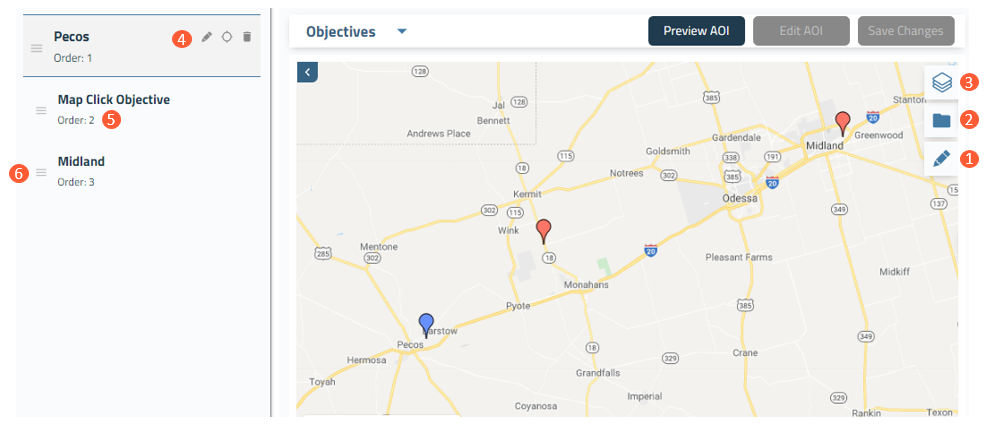
| 1. Draw Objectives | Selecting the Draw icon will change the mouse cursor to a crosshair. Click on the map to set the location of an Objective. Repeat this process to place additional Objectives. |
| 2. Upload Objectives | Select the Upload icon to navigate to the desired file. Point locations must be stored in KML/KMZ or a zipped Shapefile. * |
| 3. Layer panel | Expand to toggle on/off Project Layers and Data Layers. Note: these layers can only be viewed after a project has Archived. |
| 4. Objective actions |
Each Objective card has the option to Edit Name, Zoom To, or Delete. An existing Objective cannot be moved. To make changes to Objectives, go to Edit Objectives. |
| 5. Sort order |
Determines the direction of the route(s) stationing, starting with Order: 1. Sort Order is extremely important, especially if there are multiple Intermediate Objectives. |
| 6. Objective card handle | To change the Sort Order of Objectives, click and drag to re-position any card. |
Define Project AOI
The Project Area of Interest represents the extent of a project. All system generated routes will be confined within this AOI.
To define the AOI:
- Once a start and end objective are set; select Preview AOI to generate the Area of Interest.
- To edit an AOI, select Edit AOI. Note: This must be done before the Archive process.
- If the AOI looks appropriate, select Save Changes.
Confirm Project Mileage
When an AOI is saved, a confirmation dialogue box will appear with details regarding Project Mileage.
- The Project Mileage is calculated based on the straight-line distance between Objectives used to establish the AOI. This mileage will be deducted from you account's subscription mileage.
- Once the AOI is generated, you can create as many routes for the project as needed. There are no limits to the number of routes, as long as they are contained within the project AOI.
If everything looks appropriate, select Confirm.
- Once Confirm has been selected, the Data Archive process begins. At this time, there can be no changes to the AOI.
Next Steps
- A window in the bottom left corner can be expanded to show status information on the archival process.
- When running, the Archive Status will be orange.
- When complete, the Archive Status will turn green.
- Additional project pages can be configured while the Archive process runs.
- The next step is to configure the PLAE.
Notes
* The field names in the zipped Shapefile do not matter and will display as generic names once uploaded. However, these fields can be formatted ahead of time as: "name" (text), and "sort_order" (integer).